
The First and Most Widespread of the Lavatory Water Leaks is a Leaky Bathroom
Are you conscious that even bogs that appear to perform usually might secretly wastewater? Though they might not visibly leak onto the ground, they could possibly be silently draining water straight into the sewer system. Luckily, detecting and addressing such leaks can result in substantial water financial savings and value reductions.
One widespread indication of a bathroom leak is the sound of operating water after flushing. This may be simply checked by merely listening for any ongoing water stream. In case you discover this, a fast momentary answer is to close off the water valve close to the bathroom’s base. Doing so permits you to preserve water till the problem is resolved completely.
In most situations, the typical house owner could make these minor but pricey toilet water leaks disappear. 9 occasions out of ten, the issue comes from a worn-out bathroom flapper.
1. Flip off the water provide:
Find the shutoff valve behind the bathroom and switch it clockwise to close off the water provide.
2. Flush the bathroom:
Flush the bathroom and take away as a lot water as potential from the tank.
3. Take away the tank lid:
Take away the tank lid and set it apart in a protected place.
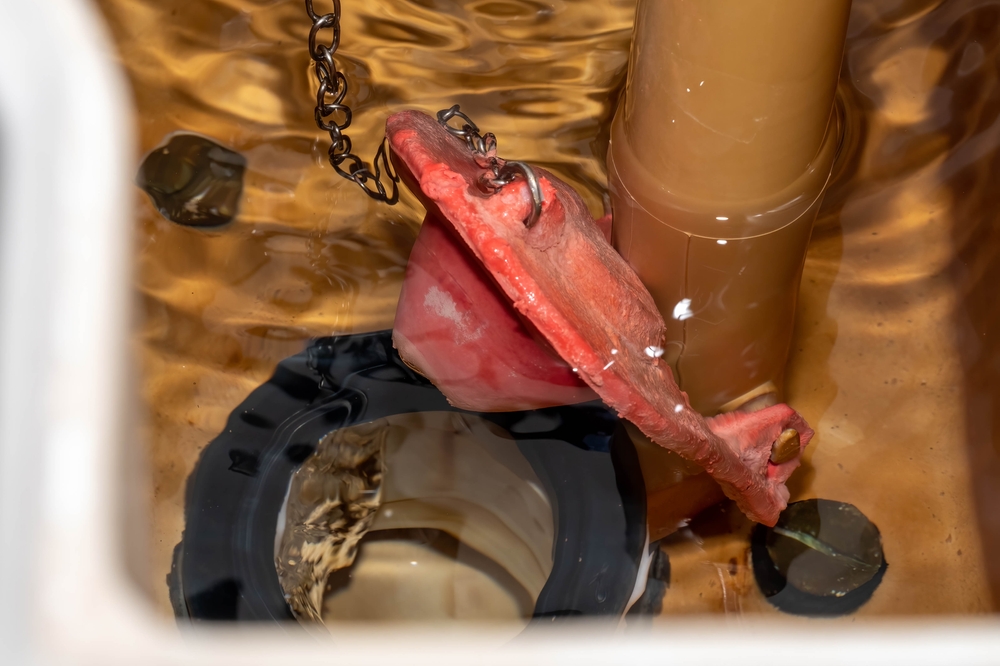
4. Establish the flapper:
The flapper is a rubber piece masking the flush valve on the backside of the tank. It’s normally linked to the flush lever by a series or carry wire.
5. Examine the flapper:
Verify the flapper for any indicators of injury, resembling cracks, deterioration, or warping. If the flapper is broken, it’ll want changing.
6. Disconnect the flapper:
Unhook the chain or carry the wire connecting the flapper to the flush lever. Some flappers might have tabs that have to be squeezed to launch them from the flush valve.
7. Set up the brand new flapper:
In case you’re changing the flapper, buy the proper sort in your bathroom mannequin. Connect the brand new flapper to the flush valve, making certain a correct seal.
8. Regulate the chain or carry wire:
If essential, alter the size of the chain or carry wire so there may be minimal slack when the flapper is closed. It will stop the flapper from getting caught open or closed.
9. Activate the water provide:
Flip the shutoff valve counterclockwise to revive the water provide to the bathroom.
10. Take a look at the flush:
Flush the bathroom and observe the flapper’s operation. Be sure it opens totally and closes securely after the flush.
11. Exchange the tank lid:
When you’re happy with the flapper’s placement, flip the water again on and substitute the tank lid to make sure it’s correctly seated.
12. Verify for leaks:
Search for any indicators of water leakage round the bathroom’s base or from the tank. Double-check the flapper’s set up and alter as wanted in the event you discover any leaks. Keep in mind, you can too hear a bathroom leak.
By following these steps, it’s best to be capable to restore a defective bathroom flapper and restore correct flushing performance to your bathroom. In case you encounter any difficulties or the issue persists, search help from an expert plumber. As a facet be aware, if in case you have by no means changed a bathroom flapper, use your smartphone to doc the elimination and take the previous flapper to your private home heart for substitute.
Repairing a Leaky Faucet is Each Swift and Finances-Pleasant
If the persistent sound of a dripping faucet is disrupting your peaceable nights and considerations about water conservation weigh in your thoughts, take coronary heart. Repairing a leaky faucet is each swift and budget-friendly, making it a manageable process for even these new to DIY tasks. Nevertheless, earlier than fixing a faucet, think about time and restore prices, particularly if the tap is low finances.
Widespread sources of faucet leaks—resembling worn-out washers or gaskets, unfastened O-rings, or corrosion within the valve seat—are sometimes straightforward to determine and resolve utilizing available faucet restore kits. In your toilet, bathe, or kitchen, leaky taps are sometimes brought on by broken or deteriorated components, particularly in older fixtures.
On this information, you’ll uncover step-by-step directions for DIY faucet restore, empowering you to deal with the problem and reclaim peace of thoughts swiftly. Able to deal with the duty? Let’s get began! Be at liberty to leap to the precise part you want help with.
Lavatory Water Leaks: Put together to Repair Your Faucet for Restore
Your kitchen or toilet faucet might sport a single or double deal with, flaunt a smooth pull-down wand design, or function a traditional twisting ball faucet in your bathe or tub. Regardless of the fashion, tackling a dripping faucet is a breeze with the suitable strategy.
1. Shut Off the Water
Earlier than diving into repairs, the primary order of enterprise is to halt the water stream. Underneath your sink, find and twist the valve to close off the water provide. If particular person shutoff valves aren’t current, flip off the water provide for the whole home.
Subsequent, open the tap to empty any remaining water within the line. To keep away from mishaps, think about using a sink stopper or masking the sink opening with a towel to stop instruments from slipping down the drain. With the water efficiently shut off, you’re prepared to repair your faucet and restore performance to your area. Let’s get began repairing these toilet water leaks!
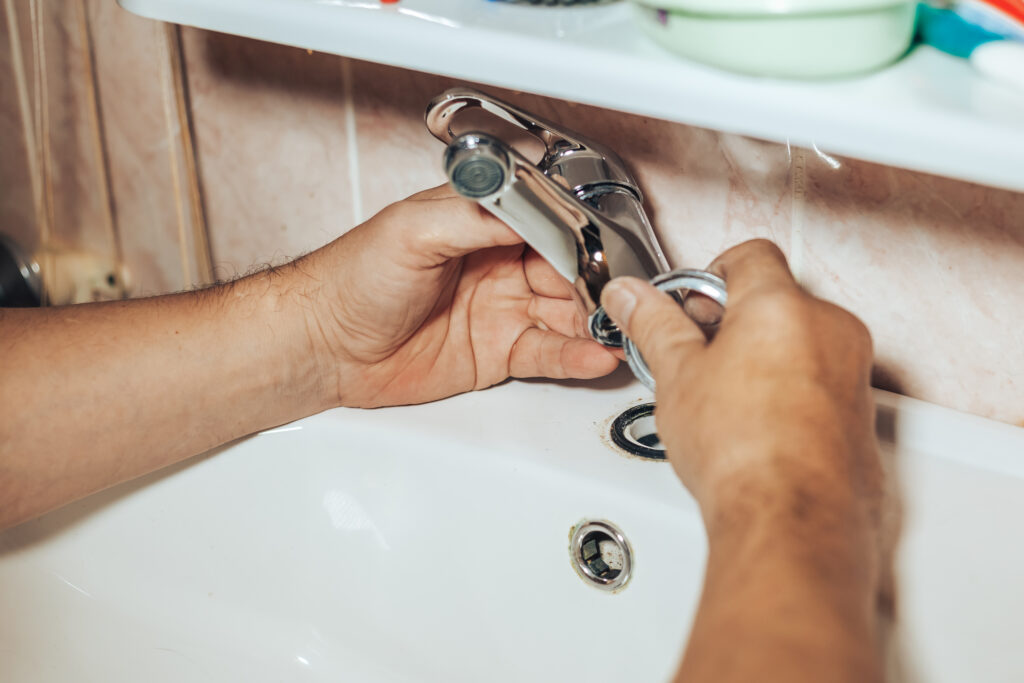
2. Eradicating the Faucet Deal with
The method of eradicating your faucet deal with hinges on the kind of faucet you’ve got, however worry not; it’s an easy endeavor.
For taps with a set screw behind the deal with, merely insert a hex key or Allen wrench into the screw and switch it to loosen and take away the deal with.
In case your deal with encompasses a high screw cowl, gently pry it off utilizing a flat screwdriver, after which use a Phillips head screwdriver to loosen the screw beneath the duvet. With the screw loosened, the deal with ought to simply come off.
Choices:
- Now, in the event you’re coping with a bathe or bathtub faucet, eradicating the deal with requires a tad extra effort.
- If the deal with has a cap, make the most of a flat-head screwdriver to take away it. Proceed to unscrew the deal with utilizing a Phillips screwdriver.
- Behind the deal with, chances are you’ll discover a faceplate connected to the bathe wall. If it’s threaded, merely unscrew it and take away it.
- Find the metallic sleeve masking the bathe valve and both pull it off or unscrew it, relying on the design.
- In case your bathe valve encompasses a locking clip, gently pry it off utilizing needle-nose pliers or a screwdriver.
With the deal with efficiently eliminated, you’re one step nearer to resolving the problem and having fun with a leak-free faucet as soon as extra. Sustain the good work!
Changing the Cartridge or Stem
In most two-handled kitchen and loo faucet designs, the tap cartridge or stem performs a vital function in regulating the stream of cold and warm water. Right here’s how one can effectively substitute this important part:
1. Loosen the Packing Nut:
Utilizing a wrench, gently loosen the packing nut positioned within the deal with meeting. As soon as loosened, fastidiously take away the nut and set it apart.
2. Take away the Cartridge or Stem:
With the packing nut out of the best way, gently pull the cartridge or stem straight up and out of the meeting. Take care to deal with it delicately.
Lavatory Water Leaks: Putting in a New Cartridge:
When you’ve recognized the cartridge or stem because the offender behind your dripping faucet, it’s time for a substitute. Right here’s what you could do:
1. Establish the Right Substitute:
Cartridges and stems are available in numerous styles and sizes, so understanding your faucet’s producer and mannequin quantity is essential to discovering the suitable substitute half. If not sure, take the previous cartridge or stem to the shop for reference.
2. Clear and Put together:
Earlier than set up, clear and dry the world across the deal with and all components utilizing a fabric. Examine the O-rings across the housing and substitute any that seem broken or worn.
3. Insert the New Cartridge or Stem:
Guarantee the brand new cartridge or stem is aligned accurately, then insert it into the meeting.
4. Reattaching the Faucet Deal with:
With the brand new cartridge or stem in place, it’s time to reattach the tap deal with. Comply with these steps:
5. Return to Earlier Steps:
Reattach the deal with by reversing the method outlined earlier. As soon as accomplished, flip the water line again on and take away any particles or towels from the sink.
6. Verify Water Move:
Run each cold and warm water via the tap for a couple of minutes to make sure the aerator isn’t clogged. The aerator could be simply eliminated and cleaned if buildup hinders water stream.
By understanding your faucet’s {hardware}, you empower your self to deal with points as they come up successfully. Whereas fixing a leaky faucet might require some effort and time, having the suitable instruments for plumbing restore or faucet substitute is crucial.
Your DIY Restore Gives a Sense of Accomplishment
Addressing the 2 commonest toilet water leaks—faucet leaks and bathroom leaks—could be simply tackled by the do-it-yourselfer (DIY) with the suitable steerage and instruments. Whether or not it’s a leaky faucet brought on by a worn-out cartridge or a bathroom leak stemming from a defective flapper, the options supplied by Large B’s Plumbing empower owners to save lots of water, cash, and the atmosphere.
By following step-by-step directions and using available restore kits, DIY lovers can efficiently resolve these points and restore performance to their toilet fixtures. Not solely does DIY restore supply a way of accomplishment, nevertheless it additionally promotes self-sufficiency and reduces the necessity for skilled intervention, saving each time and bills.
With a dedication to sustainability and effectivity, addressing toilet water leaks via DIY restore ensures a extra snug and eco-friendly residing atmosphere for all. So, don’t let leaks linger—seize your instruments, comply with the skilled recommendation from Large B’s Plumbing, and take delight in resolving these widespread family nuisances by yourself.